Sunday, 24 February 2019
Thursday, 20 February 2014
Washing Up Bowl Guitar Amp
Here's another amp based on runoffgroove's wonderful Ruby -
http://www.runoffgroove.com/ruby.html.
The Ruby amp is great for knocking up cheap and cheerful creations when an idea strikes to build an amp out of something you've got lying around - a washing up bowl in this case - perhaps more accurately described as a tub, given the shape?
A side benefit of this kind of activity is always discovering something new that can be applied elsewhere. A bit of trial and error with the construction led to a new idea for covering/surfacing things that might be put to good use on other builds - perhaps a guitar or some furniture. Anyway, hopefully the pictures speak for themselves, with a few notes here and there.


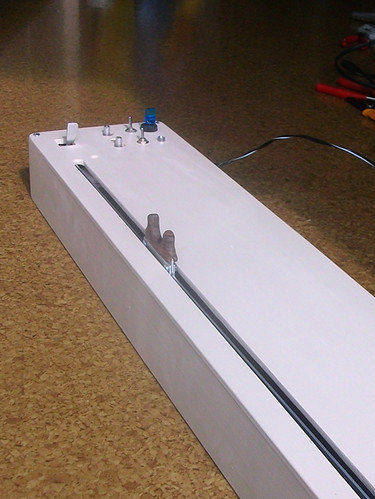
A washing up bowl on legs with plywood face.

Retro style legs from an old clock resembling a TV, drawer handle and 9 volt socket affixed to bowl.

Ruby circuit and speaker mounted on fabric-wrapped plywood face.

The speaker grille is a rigid, fibrous mesh used by gardeners for potting. It's lacquered to the fabric-wrapped wood and the whole thing lacquered some more.

The look of yesteryear, the smell of tomorrow (or sometime in the future when the lacquer finally cures for good).

Turned out looking quite neat. I will use the lacquered fabric technique again.

The control panel. Prepared in Inkscape using dials generated with Scale Generator. Lacquered to a ply panel.
I suppose I should post some audio or video files to demonstrate how it sounds but that will have to wait for now.
Friday, 22 February 2013
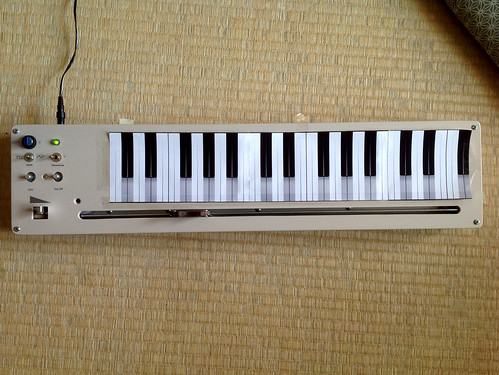
Tannerin / Electro-Theremin
About 3 years ago I began thinking about making an electro-theremin (or Tannerin as some might call it) after Gakken released the SX-150 synthesizer kit. I finally got round to it this year.
Basically, I've just replaced the original resistor ribbon and touch pen with a multi-turn potentiometer of the same value (100K) and put it all together in a case. I disabled the pitch envelope as that wasn't needed and added a slider pot to the output in order to give volume control. This is sprung so it will always kill the sound unless held open. I wanted to have some kind of soft control over the volume - a bit like the controls on an Ondes Martenot.
The current set up has a 2 and a half octave range. I've printed out the keys for guidance. It would be nice to have them permanently marked out on the case but I'm finding their position can be prone to wander!
It sounds pretty awful - check the video below
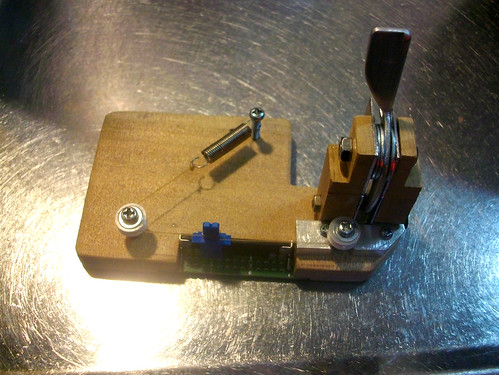
A cord from an old radio turns the potentiometer.
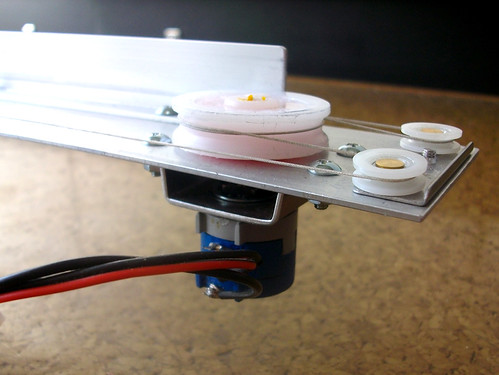
The cord wraps around pulleys and the tension is maintained by a spring.
The handle and slider - this runs up and down an aluminium runner and pulls the cord to turn the potentiometer.
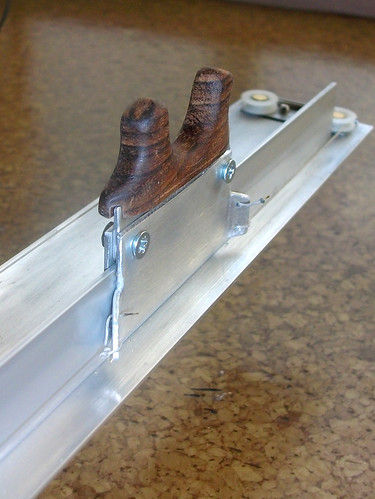
Placing the thumb and forefinger on each side allows you to see which note you are 'hitting' in the space between.

The slider on the runner protrudes through a slot in the case.
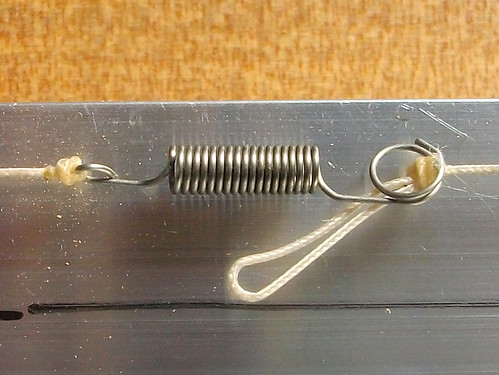
This is the volume control - a lever is connected to a nylon line that wraps around the slider pot and then to a spring. Holding the lever open controls the volume accordingly.
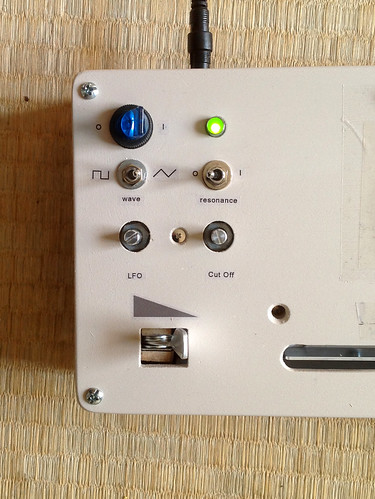
The controls.
Thursday, 21 February 2013
Rotary Speaker mkII
This is my new improved rotary speaker - with foot pedal speed control. The foot control simply turns a potentiometer that's connected to a PWM circuit driving the motor speed.
This approach is similar to the treble horn of a Leslie speaker.
This approach is similar to the treble horn of a Leslie speaker.

A piece of PVC duct pipe bend is rotated above the speaker. There's a paper cup (with bottom removed) wedged into the pipe to give more 'fling' to the sound.

Here's what's inside - a motor and belt which are enclosed in the box. You can see the speaker below.

Foot Controller.

This is the mechanism in prototype.

And the finished pedal.

As usual I'm using a Ruby amp to drive the speaker: http://www.runoffgroove.com/ruby.html
Here's a video of it in action with guitar and then keyboards -no other effects.
Thursday, 3 May 2012
Bass Guitar and Amp
A couple of recent projects - a bass guitar conversion and another Ruby amp.
1. Bass

Above is the finished bass - it started out as a Fernandes Pie-Zo (called a Nomad Bass outside Japan, I believe).

Usually looks like the above - this was not the one I messed about with! The one I got was trashed - it came from a junk shop. There was a piezo pickup in the bridge with a built in amp and speaker. On my junk acquisition, these were sort of working but very temperamental and, when they did work, I couldn't get along with the sound. I decided to rip it all out and install a magnetic pickup. I used an old Schaller humbucker. (I hope to use the piezo for something else if it does work OK). The neck was also a bit off but luckily it could be adjusted. The new bridge also allows the action to be set - the old one was fixed.

Filling the body.

Respray, red oak veneer and lacquered.

New bridge.

Done.
2. Amp.
This one turned out pretty decent sounding when hooked up to an old Hi-Fi speaker. Even with the gain cranked up it remains fairly clean and this particular speaker/cab gives a warm tone, so it became my bass amp.


Build your own amp, check out the Ruby page here: http://www.runoffgroove.com/ruby.html
Guess I should post some audio & video
Monday, 5 December 2011
Rotary Speaker - update
Some update on the rotary speaker project.

I finished the enclosure and decided it needed covering.

Blue vinyl table cloth.

Control panel - photoshop, printed on paper and laquered onto box.

I need to clean up the front a little. I have a temporary plastic grill in there until some wire mesh comes my way.

It's looking a bit 'Toys 'R' Us'.

I need to wire a socket for the power supply. The pot on the back sort of fine tunes the speed. One control would be better, but until I can build a proper speed control, this allows slower speeds. I did build a very simple PWM circuit but the motor actually makes too much noise as it pulses on and off. so either I need a more sophisticated circuit, or an enclosure to silence the motor? Anyway, at this stage it works as required, so aside from a few cosmetic jobs, it's more or less finished.
Audio/video to follow
Audio/video to follow
Saturday, 12 November 2011
rotary speaker
Been working on a rotary speaker project.

I spent a while experimenting with drive bands and pulleys before settling on a coffee cone/dripper attached directly to the shaft of an old motor from a tape deck.


A paper cone sticks out the side of the coffee dripper


Using an old Fostex speaker.
I'm now thinking about how to finish the enclosure and mount the controls. I have a PC fan controller to adjust speed but it only has an affect from 12V down to about 6V - it needs to go down to about 3V for slow rotation. I might build a PWM circuit to control the motor.
Here's a video test drive:
Subscribe to:
Posts (Atom)